This post is an excerpt of the Chapter 4 “Getting Started with Embedded Systems” in Building the Web of Things, a Manning book by Dominique Guinard and Vlad Trifa.
In a previous post we talked about the increasing importance of Node.js for embedded systems in the IoT but we didn’t have a concrete look at what using Node.js on an embedded device looked like. In this post we’ll look at what it means for the Raspberry Pi.
Installing Node.js on a Raspberry Pi
The first step is to install Node on your Pi. The latest versions of Raspbian (the Pi OS) come bundled with Node.js already however the installed version is usually quite outdated. Getting the latest version is pretty straightforward but you’ll need to install a special version of Node. “Why can’t I just use the standard Node.js version?” we hear you say. Well, the Pi — and generally most of the embedded devices out there —run on CPU architectures that are not compatible with the ones your PCs run on (x86 or x64). More precisely a lot of embedded devices run on ARM processors (which is what’s on your Pi). As a consequence the node binaries that you need on your Pi are not the same as the ones you need on your PC. Fortunately enough, since Node version 4.0.0, ARM binaries are also available from the official Node web site. To install the ARM version of Node.js go to the Node download page and select the right version for your Pi (or other embedded device). As shown in the figure below the archive to download depends on the version of the ARM architecture your device uses. As an example, the Pi 2 runs on a ARMv7 architecture while the Pi Zero runs on a ARMv6 architecture.
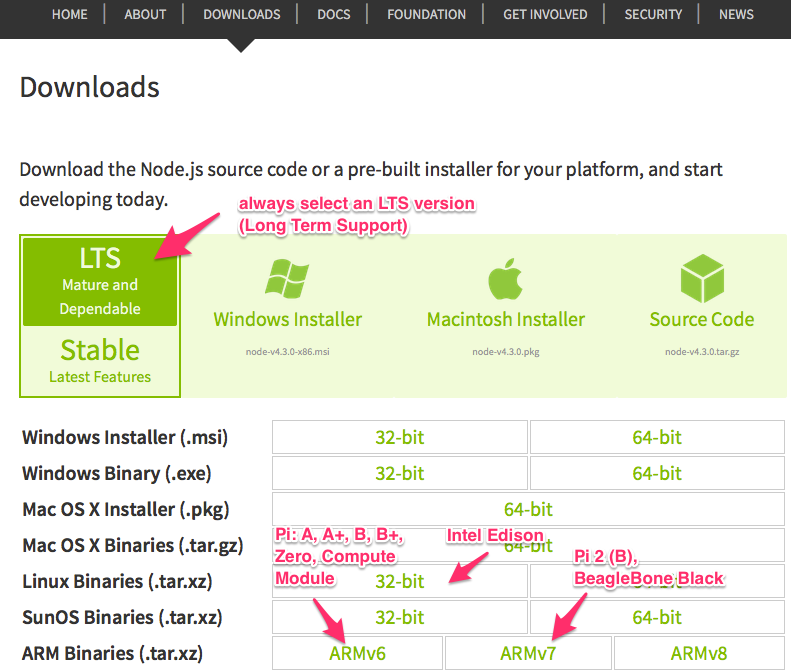
Node.js downloads for Raspberry Pi
Once downloaded you can install it via:
Sensors, Actuators and GPIOs
With Node.js installed, your Pi is now ready to conquer the World Wide Web of Things, but it doesn’t have much to work with in the real world yet. To make it more real-world connected you’ll connect some sensors (for example, a humidity sensor) and actuators (for example, an LED) to the Pi.
The way to do this on most embedded platforms, Pi included, is to connect the sensors and actuators using the general-purpose input/output (GPIO) ports. Essentially, a GPIO is a pin on which current can be read or outputted. GPIOs have two modes: an input mode and an output mode. When the output mode is selected, the pin can be set to HIGH, which means it outputs 3.3 volts; when the pin is set to LOW, it is off and does not output any voltage. With the input mode you essentially can read a value on the pin. Unlike other embedded platforms (such as Arduino), the Pi supports only digital input. What this means concretely is that you can work only with components that supply series of 0s (LOW, ~0 volts) or 1s (HIGH, 3.3 volts) to the input pins, that is, with digital components. As an example, an LED is a digital actuator and a button is a digital sensor.
Back to our GPIOs: the numbering and type of each GPIO differs depending platform you’ll choose to use. For instance this is the layout for a Pi Zero or a Pi B, Pi 2 and Pi 3.
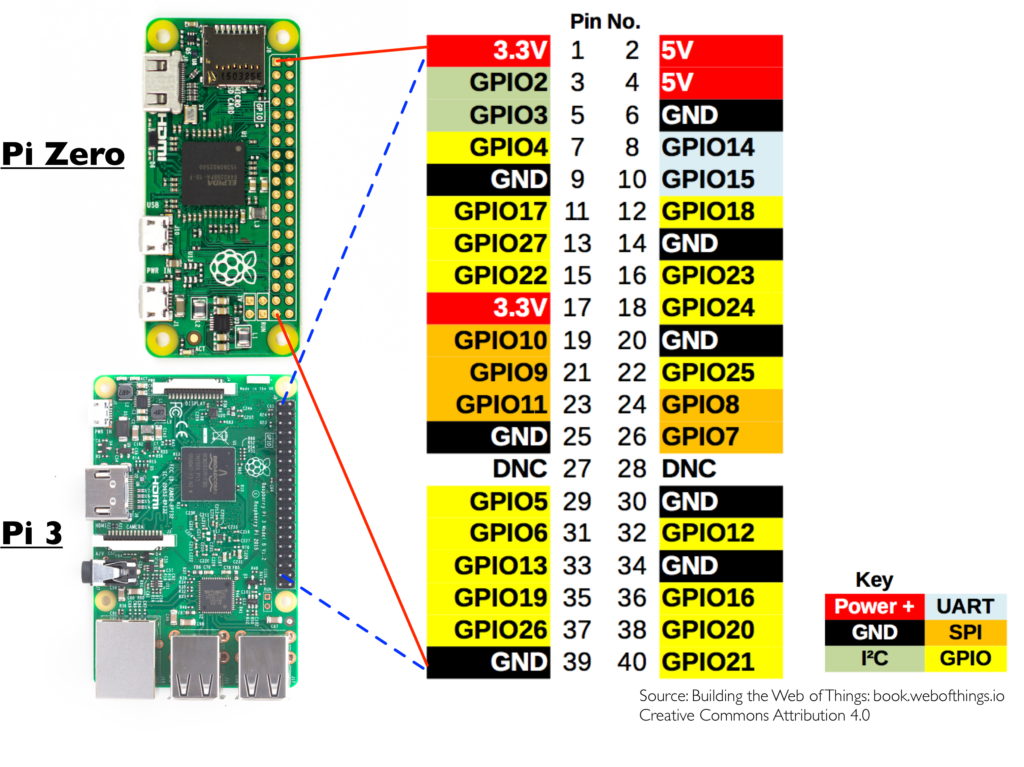
Figure 1 – GPIO layout for the Raspberry Pi
or the layout for the Intel Edison when using the mini prototyping board:
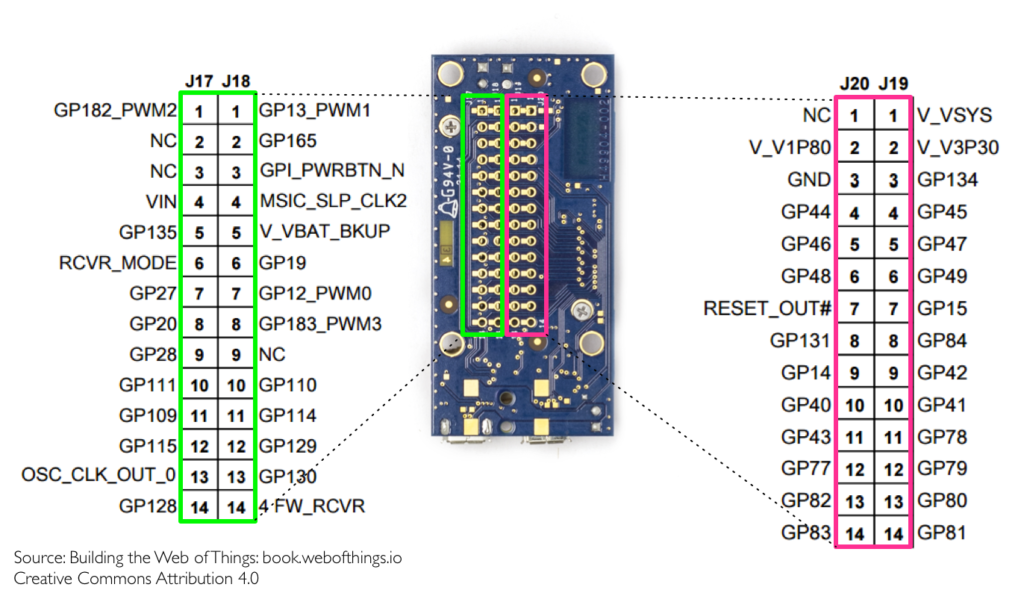
Figure 2 – GPIO layout of Intel Edison board
Your first circuit using GPIOs: LEDs
If you’ve never worked with the GPIOs of embedded devices let’s start with the Hello World of embedded : blinking LEDs! For the sake of simplicity we’ll assume you have a Pi in the rest of the post but you can also implement this with an Intel Edison, Beaglebone, Samsung ARTIK or any Linux-based embedded device you can think of!
Start by placing the elements on the breadboard, as shown in the figure below. If it’s the first time you work with electronics, we recommend you use an anti-static mat or a grounding strap to avoid damaging your embedded device.
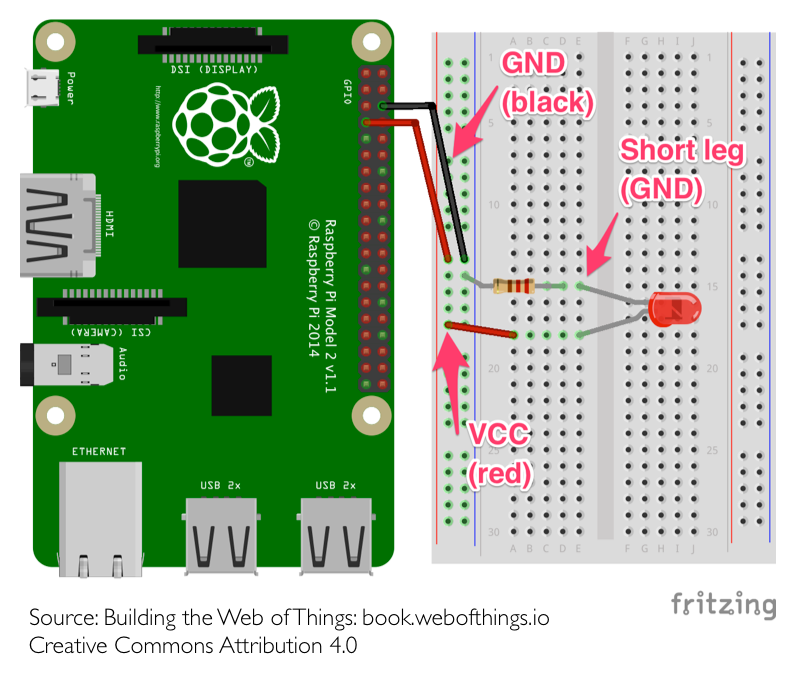
Figure 3 – Connect an LED to the Pi GPIOs
GPIO and Node.js
The hardware is now ready, so you can start working with GPIOs! You can find a dozen Node.js GPIO libraries for the Pi, offering different abstraction layers and functionality. We decided to use one we really like called onoff. Create a new folder and install onoff with NPM
npm install onoff --save
You’re now ready to interface the Pi with sensors and actuators. In software engineering, the simplest piece of code one can write—the famous Hello World—is a piece of code that displays “Hello World” in the console. The Hello World equivalent of the IoT is to make a real LED blink, so let’s build exactly that as shown in the next listing.
As mentioned before, you’ll use pin 7, corresponding to GPIO 4 (see Figure 1 above). You’ll then create a function that opens the pin in output mode (which means you’ll “push” current on it). It then either activates the pin or deactivates it (depending on the result of the modulo function) and launches itself again at a specified interval. Finally, you listen for SIGINT, which corresponds to pressing Ctrl-C, and ensure that you release the pin and turn the LED off before exiting.
That’s it for this introduction but should you want to learn more our latest book: Building the Web of Thing covers how to integrate other sensors and actuators such as a passive infrared sensor (aka PIR) or a temperature and humidity sensor. Furthermore, you’ll discover how to integrate these sensors to Web with protocols such as HTTP, WebSockets, CoAP and MQTT.


